
Key Takeaways
- Calibrating a pressure transducer is not the same as calibrating a mechanical gauge; it requires verifying the entire electrical output signal chain, not just a pressure reading.
- Accredited calibration is often required by customer contracts (aerospace, automotive) and regulations (medical devices), or when tight tolerances demand a low measurement uncertainty that field calibration cannot achieve.
- A proper multi-point calibration with ascending readings, and descending readings where appropriate, is a highly recommended best practice for evaluating linearity, hysteresis, and overall performance, especially for higher-accuracy gauges and transducers.
- An audit-ready calibration certificate must include as-found and as-left data, a stated measurement uncertainty with its coverage factor, and traceability to a national standard.
- When the Test Uncertainty Ratio (TUR) is below 4:1, your calibration provider should be applying guard banding to tighten acceptance limits and reduce the risk of passing a non-compliant instrument.
Quality managers often share stories about reviewing a year's worth of pressure transducer calibration certificates from a previous provider and discovering that the work was completed on schedule, but the certificates were hollow. They listed no measurement uncertainty, no as-found data, and no clear traceability for the reference standards used. During the next customer audit, those omissions became a critical finding. Every measurement those transducers supported for the past twelve months was suddenly indefensible. The cost of the corrective action and revalidating months of production data dwarfed the cost of the original calibrations.
This is the central challenge of pressure transducer calibration. It's not just a procedural problem; it's a documentation and accreditation problem. Most organizations calibrate their pressure instruments regularly, but few ask the critical follow-up question: is the calibration itself defensible?
This guide provides that clarity. Precision Calibration Systems will walk through when pressure transducer calibration requires an accredited laboratory, detail the five-point procedure that separates a cursory check from a comprehensive analysis, and specify exactly what an audit-ready calibration certificate must contain to keep your program compliant and in control.
Pressure Transducer vs. Pressure Gauge: Why the Calibration Approach Differs
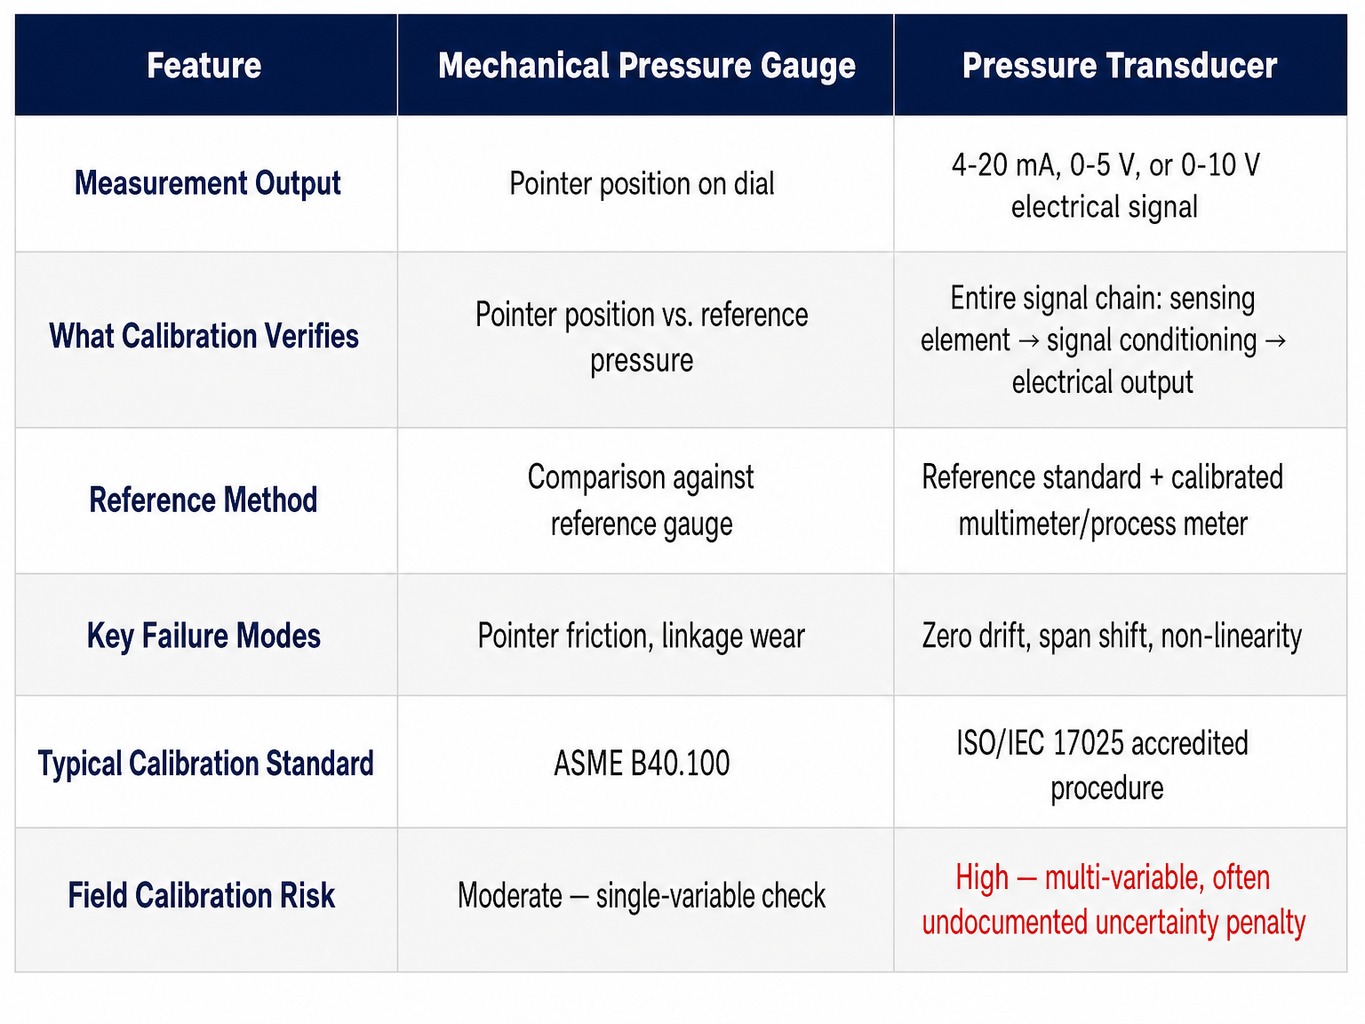
Calibrating a pressure transducer is fundamentally different from calibrating a mechanical pressure gauge. While both measure pressure, a transducer converts that pressure into an electrical signal, typically a 4-20 mA current loop, 0-5 V, or 0-10 V, and its calibration must verify the integrity of that entire measurement chain.
Consider a maintenance technician calibrating a standard Bourdon tube gauge compliant with ASME B40.100. They might compare its reading against a reference gauge, a simple, single-variable check. But when that same technician faces a strain-gauge pressure transducer, the problem becomes multi-variable. They must verify not only the pressure response but also the stability of the excitation voltage, the accuracy of the zero offset and span, the transducer's linearity across its range, and the integrity of the final milliamp or voltage signal output.
A pressure transducer's electrical output signal means that the calibration must verify everything from the sensing element through the signal conditioning electronics. A mechanical gauge calibration, by contrast, only compares a pointer position against a reference. Treating them identically misses the transducer's unique failure modes, such as zero drift, span shift, and non-linearity. This is why field calibration of transducers may carry a larger, and sometimes undocumented, uncertainty burden depending on the environment, setup, and documentation controls in place, which can make accredited laboratory calibration the better choice for tighter tolerance applications.
When Pressure Transducer Calibration Requires an Accredited Laboratory
Not every pressure transducer calibration needs to be performed in an accredited laboratory. However, many quality managers, engineers, and lab managers underestimate how often their own quality system, customer requirements, or regulatory environment actually demands it. The decision hinges on two types of triggers: explicit requirements from customers and regulators, and implicit requirements driven by measurement risk. In pharmaceutical and life science operations, those triggers are especially common because pressure data often supports product quality, sterility assurance, and environmental control records that must stand up during audits and investigations.
Regulatory and Customer-Driven Accreditation Triggers
The most common trigger for accredited calibration is not an internal policy, but a requirement imposed by an outside body. These mandates are non-negotiable and include:
- Customer Flowdown Clauses: In aerospace, defense, and automotive supply chains, prime contractors flow down their quality requirements. A contract for an aerospace supplier might explicitly require that all measurement and test equipment be calibrated by a laboratory accredited to ISO/IEC 17025.
- Regulatory Compliance: Medical device manufacturers operating under FDA 21 CFR Part 820, pharmaceutical manufacturers operating under FDA 21 CFR Part 211 current good manufacturing practice requirements, and automotive suppliers compliant with IATF 16949 are required to control their inspection, measuring, and test equipment. While the regulations may not name ISO/IEC 17025 explicitly, using an accredited lab is the most direct way to demonstrate objective proof of competence and traceability to an auditor.
- Validated Pharmaceutical Systems: In pharmaceutical plants, pressure transducers are often tied to validated processes and critical utilities. Common examples include cleanroom differential pressure monitoring used to confirm air cascade performance between classified spaces, autoclave sterilization cycles where pressure data supports cycle acceptance, and process skids where pressure readings become part of batch or environmental records. In these cases, weak calibration documentation can create cGMP exposure because the measurement result is connected to product release, contamination control, or deviation investigations.
During an audit, a certificate from an unaccredited source simply carries less weight. Accreditation to ISO/IEC 17025 means a laboratory's technical competence, management system, and specific Calibration and Measurement Capabilities (CMCs) have been independently verified by an accrediting body like A2LA. It's also critical to verify that a provider's scope of accreditation is parameter-specific and range-specific. A certificate bearing an accreditation logo is only valid if the actual pressure range of your transducer falls within the parameters listed on the provider's published scope.
When a pressure transducer calibration certificate lacks stated measurement uncertainty or proper traceability documentation, every test result that instrument supported becomes retroactively questionable. In a pharmaceutical setting, that can expand from a simple maintenance issue into a batch record review, a deviation, or a validation documentation gap. An accredited laboratory like Precision Calibration Systems structures its calibration certificates to include the uncertainty statements, reference standard identification, and traceability chains that auditors specifically look for, making compliance a standard part of the service.
Risk-Based Triggers: When Measurement Decision Risk Demands Lab-Grade Uncertainty
Even without an explicit mandate, your own process tolerances can demand accredited calibration. This is a function of Measurement Decision Risk (MDR), the risk of making an incorrect decision based on a measurement. Specifically, it's the risk of a false accept, accepting a bad part, or false reject, rejecting a good part, because of uncertainty in your measurement system.
That risk is especially easy to underestimate in pharmaceutical applications because the pressure values themselves may appear modest while the consequence of a bad decision is significant. A low-range differential pressure transducer used to verify cleanroom pressurization may have a narrow tolerance band and must remain defensible as part of contamination control. A pressure transducer used during autoclave validation or routine sterilization monitoring may influence whether a cycle is accepted, investigated, or repeated. In both cases, the measurement does more than indicate pressure. It supports a compliance decision.
Imagine a pharmaceutical manufacturer monitoring an autoclave sterilization cycle where pressure must be maintained within a ±2% tolerance band. If their field calibration process has an uncertainty that consumes 60% of that band, there is very little margin left for the transducer's own drift or environmental effects. The measurement becomes unreliable.
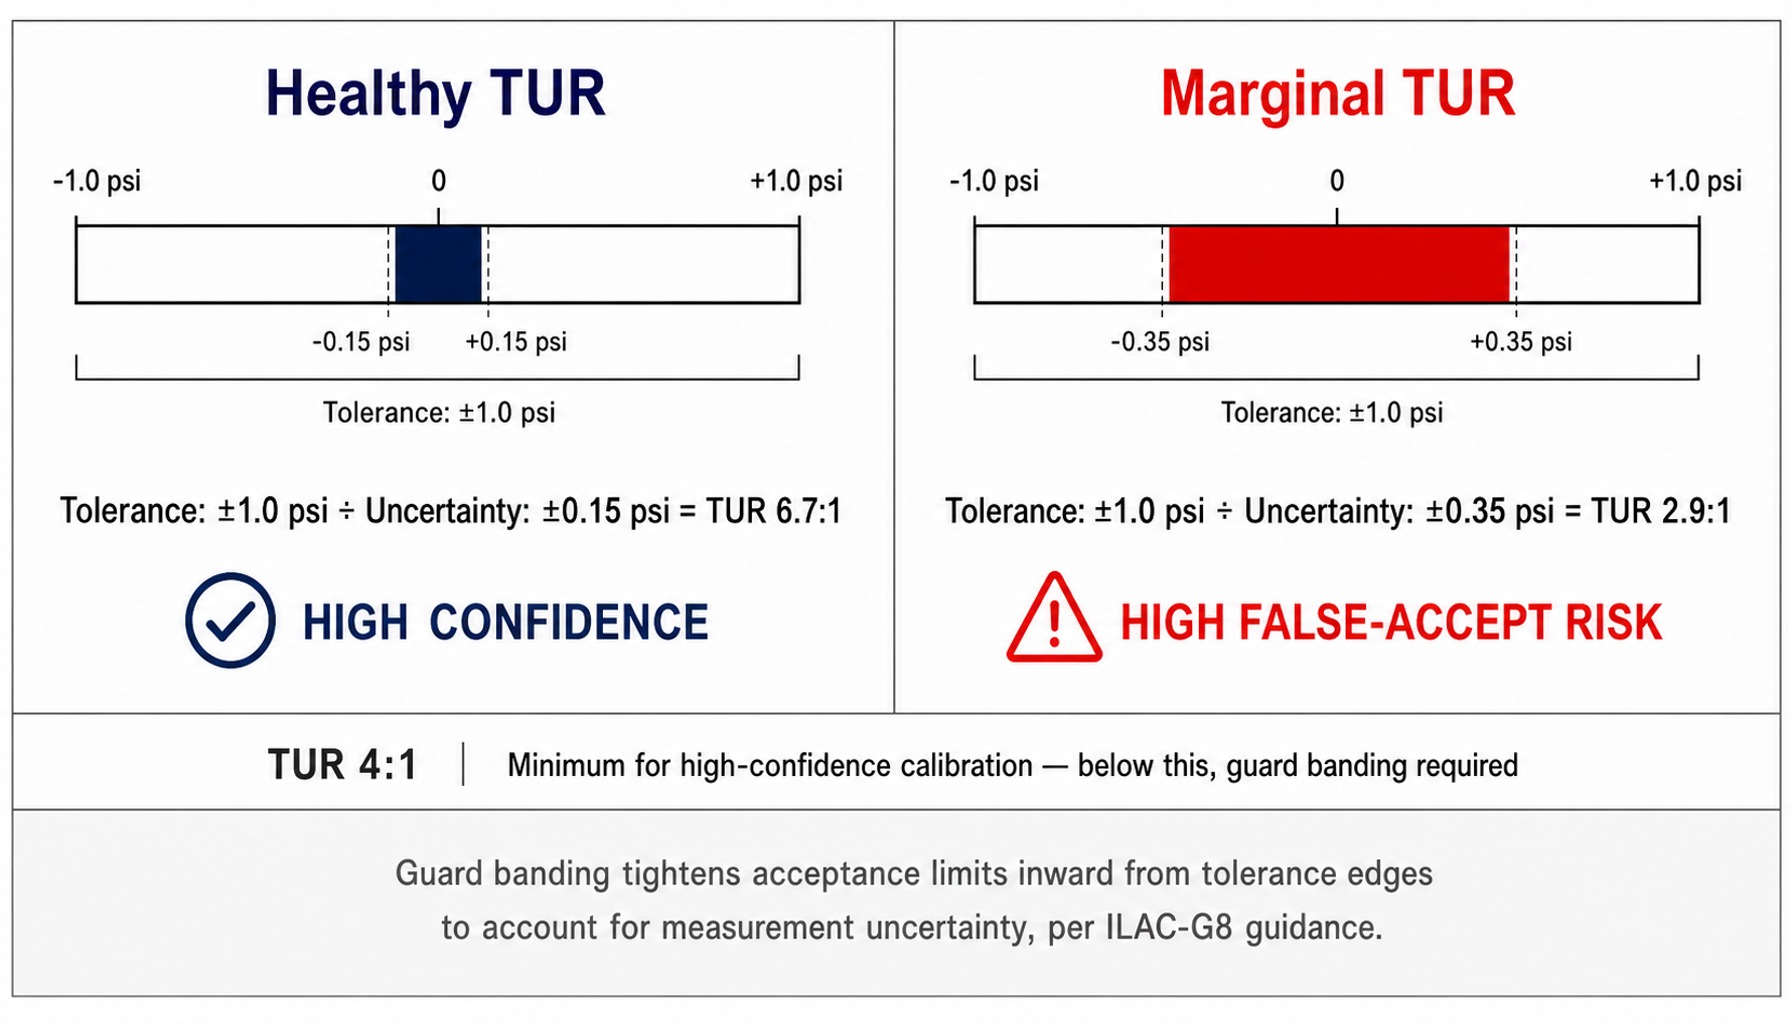
This is where the Test Uncertainty Ratio (TUR) becomes the deciding factor. A TUR of 4:1, meaning the tolerance of the unit under test is at least four times greater than the uncertainty of the calibration, is the traditional minimum for a high-confidence calibration. When TUR drops below 4:1, the risk of a false accept increases dramatically. Accredited laboratories provide the low measurement uncertainty needed to achieve a healthy TUR, ensuring your measurements are not just compliant, but reliable.
The Multi-Point Ascending and Descending Calibration Procedure
For a pressure transducer, a multi-point calibration with ascending pressure readings is the core method for characterizing performance across the range. Adding descending pressure readings is a highly recommended best practice and an industry-standard approach when evaluating hysteresis, repeatability, and overall performance, especially for high-accuracy gauges and transducers.
Ascending test points are typically set at every 25% of the transducer's full-scale span (0%, 25%, 50%, 75%, and 100%). Descending readings are then added when the application, device type, accuracy requirement, or customer specification makes hysteresis evaluation important. In many higher-accuracy calibrations, a full descending sweep is the preferred approach. In more routine checks, the descending portion may range from a single midpoint verification to a fuller return run, depending on requirements. Performing only an ascending check can miss hysteresis and other flaws that appear on the descending leg.
Equipment Setup: Reference Standards, Connections, and Leak Checks
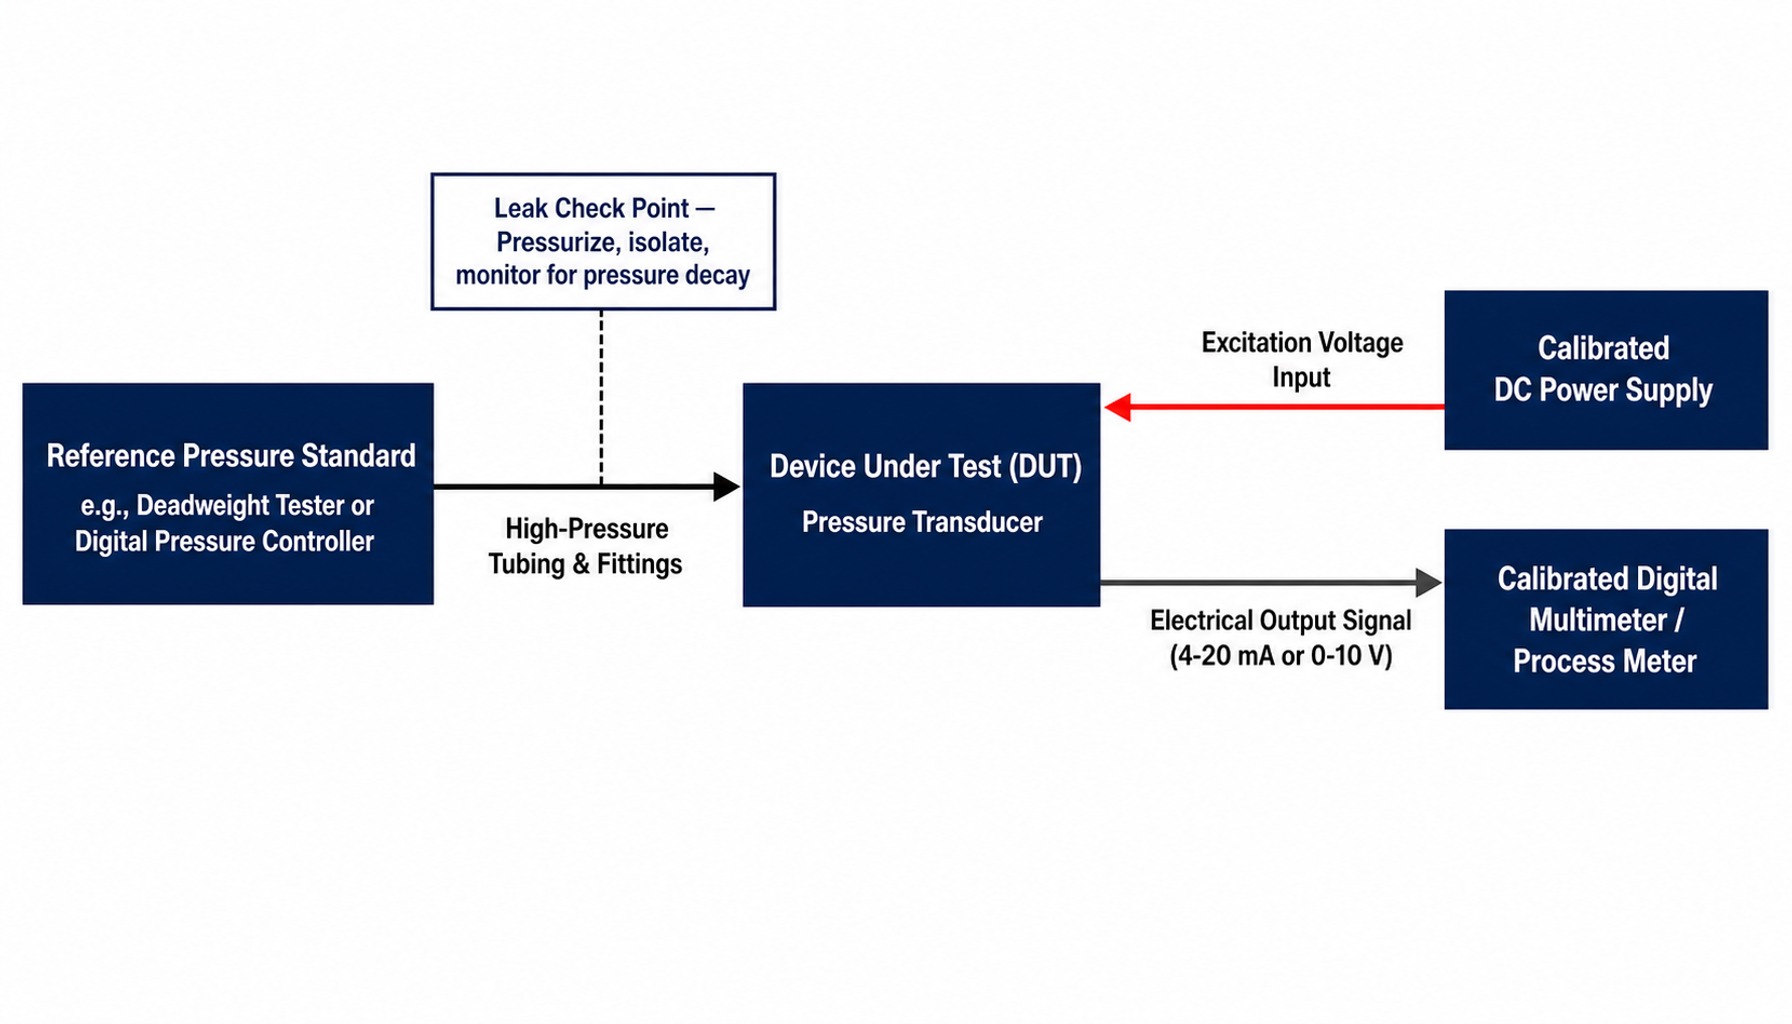
A proper laboratory pressure transducer calibration begins with a meticulously configured equipment chain. This includes:
- Reference Standard: A high-accuracy pressure controller or deadweight tester. Instruments like the Fluke 721, Additel 761, or Mensor CPC8000 are common in accredited labs, providing the low uncertainty needed for a high TUR.
- Connections: Appropriate high-pressure fittings, tubing, and adapters to connect the Device Under Test (DUT) to the reference standard without leaks.
- Power Supply: A stable, calibrated DC power supply to provide the correct excitation voltage specified by the transducer's manufacturer.
- Readout Device: A calibrated high-resolution digital multimeter or process meter to precisely measure the transducer's electrical output (e.g., 4.001 mA).
Before any data is recorded, a leak check must be performed. The system is pressurized, the source is isolated, and the pressure is monitored for any decay over a set period. It sounds basic, but skipping this step is one of the most common causes of erratic and non-repeatable calibration data, especially when dealing with used fittings or worn seals.
Read more: Multimeter Calibration Services | Precision Calibration Systems
Executing the Ascending and Descending Runs and Recording As-Found and As-Left Data
Once the system is verified to be leak-free, the measurement sequence begins. This process captures the transducer's performance before and after any necessary adjustments.
- Exercise the Transducer: The transducer is pressurized to its full-scale range and vented several times to stabilize the diaphragm and internal components.
- Record As-Found Data: Starting at 0% of range, the technician applies pressure, allows the reading to stabilize, and records both the reference standard's pressure and the transducer's electrical output. This is the as-found data. This step is repeated at each ascending test point, typically every 25% of span through 100%. Descending readings are then added as appropriate for the device type, required accuracy, customer expectations, or calibration procedure. For some pressure transmitters, the descending check may be a single point at approximately 50% of span, while other applications may call for a fuller descending sequence. The as-found data is what auditors care about most, as it proves whether the instrument was operating within tolerance during its last service interval.
- Perform Adjustments (If Necessary): If the as-found data is out-of-tolerance, an adjustment is made. This could be a simple zero offset or span adjustment, or a more complex HART trim for a smart transmitter. It is critical to understand that adjustment is not calibration. Calibration is the act of comparison and documentation; adjustment is a correction.
- Record As-Left Data: After adjustment, the full calibration run is repeated to capture the as-left data. For higher-accuracy work, this often includes both ascending and descending points. For more routine work, the as-left sequence should follow the applicable procedure and required data set. This dataset proves the transducer is now operating correctly and within its specified tolerance.
Hysteresis in a pressure transducer is only visible when the calibration procedure includes descending pressure readings in addition to the ascending run. Even a single descending check point can reveal whether the transducer's return path deviates significantly from its ascending response. An ascending-only check can still appear acceptable while missing descending-leg deviation that matters in tighter-tolerance or higher-accuracy applications. Both as-found and as-left datasets must appear on the final certificate for it to be considered complete and audit-ready.
Measurement Uncertainty, Test Uncertainty Ratio, and Guard Banding
A calibration result without a stated measurement uncertainty is not a result, it is a number without context. Measurement uncertainty is the quantified doubt surrounding a measurement, expressed as a range, for example ±0.05 psi at a stated confidence level, typically 95% with a coverage factor of k=2. It accounts for the error sources in the calibration process, including the reference standard, the calibration setup, environmental influences, and other B-type uncertainty contributors.
This uncertainty value is what allows you to calculate your Test Uncertainty Ratio, or TUR. TUR compares the tolerance of your transducer to the uncertainty of the calibration that was performed. In many laboratory setups, achieving a 4:1 TUR for the measurement process itself is very feasible. The challenge is that the overall TUR seen in practice is often pushed lower once contributors from the Unit Under Test are included, such as resolution, repeatability, stability, and other performance characteristics of the transducer itself.
Consider a transducer with a tolerance of ±1.0 psi.
- If your calibration provider has a total measurement uncertainty of ±0.15 psi, your TUR is 1.0 / 0.15 ≈ 6.7:1. This is a healthy ratio, giving you high confidence in the pass/fail result.
- If another provider has an uncertainty of ±0.35 psi, your TUR drops to 1.0 / 0.35 ≈ 2.9:1. This is a more limited ratio. The calibration uncertainty is now consuming a significant portion of your tolerance band, increasing the risk of a false accept.
When TUR falls below the traditional 4:1 benchmark, that does not automatically mean the calibration is invalid, and it does not mean guard banding is always applied in routine practice. Instead, the laboratory needs a defensible decision rule. Guard banding is one possible decision rule, and an advanced risk-management option, in which the acceptance limits are tightened inward from the stated tolerance to account for measurement uncertainty. Guidance documents such as ILAC-G8 and EURAMET cg-17 help frame that approach. In many everyday calibrations, laboratories document the uncertainty and the applicable TUR without applying guard banding unless the customer, procedure, or risk profile calls for it.
What an Audit-Ready Pressure Calibration Certificate Must Include
The calibration certificate is the only artifact that proves the work was done correctly. If the certificate is incomplete, the calibration is indefensible. An accredited certificate compliant with ISO/IEC 17025 clause 7.8 must include the following elements:
- Unique Certificate Identification: A unique number to track the document.
- Device Under Test (DUT) Information: Manufacturer, model, serial number, and pressure range.
- Reference Standard Identification: The specific equipment used for the calibration, with its own calibration due date and traceability to a national standard like NIST.
- As-Found and As-Left Data: The full dataset for both pre- and post-adjustment runs. This is non-negotiable.
- Statement of Measurement Uncertainty: The calculated uncertainty for the calibration, including the coverage factor (typically k=2 for 95% confidence).
- Pass/Fail Determination: A clear statement of whether the DUT met its specified tolerance.
- Environmental Conditions: The ambient temperature and humidity during calibration, as these affect both the DUT and the reference standard.
- Dates: The date of calibration and the recommended calibration due date.
- Accreditation Information: For accredited calibrations, the logo of the accrediting body (e.g., A2LA) and the lab's certificate number.
- Technician Identification: The name or initials of the person who performed the work.
The next time a pressure transducer calibration certificate arrives on your desk, check it against this list. If it's missing as-found data or a statement of uncertainty, it's not an audit-ready document.
Accredited Pressure Transducer Calibration with Fast Turnaround
The challenge for any quality manager or calibration coordinator is clear: you need the rigor of accredited laboratory calibration without the extended downtime that cripples production or lab schedules. Waiting weeks for an instrument to return is not an option.
Precision Calibration Systems is built to resolve this tension. As an A2LA-accredited laboratory (certificate 1509.03) compliant with ISO/IEC 17025, we provide pressure transducer calibration as a core service alongside our deep capabilities in torque, force, dimensional, and electrical instrumentation. Our process is designed for speed and accuracy, with most laboratory calibrations completed within seven days, minimizing the time your critical assets are out of service.
From our laboratories in Morristown and Winchester, Tennessee, we support customers nationwide with mail-in service, complemented by on-site calibration for clients across Tennessee, Virginia, Alabama, and Kentucky. Every calibration comes with a detailed, audit-ready certificate containing the as-found and as-left data, stated measurement uncertainty, and full traceability your quality system demands. We deliver the documentation you need to be confident and in control before, during, and after your next audit.
Request a quote for accredited pressure transducer calibration
From Procedure to Proof: Owning Your Pressure Calibration Program
Ultimately, pressure transducer calibration is not just a technical procedure it is a measurement assurance decision. The difference between a defensible program and a vulnerable one lives in the details: the uncertainty statement, the TUR calculation, and the completeness of the certificate. It's not about whether the technician followed the steps, but whether the final documentation proves the measurement is trustworthy.
Knowing when accredited calibration is required, understanding what TUR and guard banding mean for your acceptance decisions, and verifying that every certificate contains the elements your quality system demands these are the practices that separate a compliant program from one that only looks compliant until an auditor asks the right question. The next time a pressure transducer calibration certificate arrives, don't just file it. Check it.
Frequently Asked Questions
How does temperature affect pressure transducer calibration results?
Temperature changes affect both the transducer's sensing element (causing thermal zero and span shifts) and the reference standard. A transducer calibrated at 23°C in a controlled lab may read differently at 40°C on a process line. Accredited labs control and document environmental conditions; field calibrations in uncontrolled environments may carry a larger uncertainty from temperature effects.
When should a pressure transducer be replaced instead of recalibrated?
Replace a transducer when as-found data shows drift exceeding the manufacturer's stability specification across consecutive cycles, when it fails to hold adjustment, or when physical damage is visible. Repeated out-of-tolerance findings on the same unit are a signal of declining reliability, not a problem that calibration can permanently fix.
What is the difference between a deadweight tester and a digital pressure calibrator?
A deadweight tester generates pressure using calibrated masses and is a primary standard with very low uncertainty. A digital pressure calibrator uses an internal reference sensor and electronic readout, offering portability and speed but with typically higher uncertainty. Accredited labs select between them based on the TUR required for the device under test.
How do I determine the correct calibration interval for pressure transducers?
Start with the manufacturer's recommendation, then adjust based on your own drift data from as-found results. If transducers consistently return well within tolerance, the interval can be extended. If out-of-tolerance findings appear, shorten it. The goal is a reliability-based interval, not a fixed calendar schedule, as guided by standards like ILAC-G24.
Can I perform a shunt calibration check on a pressure transducer instead of a full calibration?
A shunt calibration (shunt cal) verifies the signal chain's electrical response by applying a known resistance but does not verify the sensing element's pressure response, linearity, or hysteresis. Shunt cal is a useful field verification check between full calibrations but does not replace a traceable pressure calibration against a reference standard.
What is the difference between accuracy class and tolerance in pressure gauge calibration?
Accuracy class (per ASME B40.100) defines the maximum permissible error as a percentage of full scale for a gauge design. Tolerance is the specific acceptance limit you apply during calibration, which may be tighter if your process requires it. Confusing the two can lead to accepting gauges that meet their class rating but fail your actual measurement needs.